Apache ActiveMQ Configuration
The asynchronous user data synchronization functionality in BPM SecurityProvider (Ganimedes) requires the installation and configuration of an Apache ActiveMQ server. This server is used to implement asynchronous user data synchronization. This document provides instructions for downloading, installing, and configuring Apache ActiveMQ and its Resource Adapter for IBM WebSphere. This functionality is optional and not required for the proper operation of BPM SecurityProvider (Ganimedes). If it is not needed, you can skip this document (see the enableMQConsumer configuration parameter in the ldap-options.xml file description).
This functionality is available from version 8.6.3.21030.3.0.0.x.
Apache ActiveMQ
The following version of Apache ActiveMQ is currently used in BPM SecurityProvider (Ganimedes): 5.16.2. You can find the available product versions at the download location.
Downloading Apache ActiveMQ
Command to download the installation package for Linux:
wget -b -t0 --no-check-certificate https://archive.apache.org/dist/activemq/5.16.2/apache-activemq-5.16.2-bin.tar.gz
Command to download the installation package for Windows (use the curl command, which is built into Windows 10/11):
curl -O https://archive.apache.org/dist/activemq/5.16.2/apache-activemq-5.16.2-bin.zip
Explanation:
curl- command for data transfer.-O(uppercase "o") - an option that instructscurlto save the downloaded file with the same name it has on the server (i.e.,apache-activemq-5.16.2-bin.zip).
Installing Apache ActiveMQ
Install according to the instructions:
Step 1: Downloading and unpacking
The downloaded file (e.g., apache-activemq-5.16.2-bin.tar.gz) contains a directory with a ready-to-run product. Unpack it into the target directory, e.g., /opt/IBM/BAW:
mkdir -p /opt/IBM/BAW
cd /opt/IBM/BAW
tar -xzvf ~/apache-activemq-5.16.2-bin.tar.gz
cd apache-activemq-5.16.2/
export ACTIVEMQ_HOME=`pwd`
echo ${ACTIVEMQ_HOME}
Step 2: Installation location
The Apache ActiveMQ product, by unpacking the apache-activemq-5.16.2-bin.tar.gz file, has been installed in the ${ACTIVEMQ_HOME} directory (e.g., `/opt/IBM/BAW/apache-activemq-5.16.2).
Step 3: Starting
Starting the product does not require additional configuration. The configuration is in the $ACTIVEMQ_HOME/conf/activemq.xml file, and changing its content is optional. We start the product with the command:
export JAVA_HOME=/opt/IBM/BPM/v8.5.7/java
$ACTIVEMQ_HOME/bin/activemq start
Step 4: Checking the operation
You can view the logs of the running product with the command:
tail -f $ACTIVEMQ_HOME/data/activemq.log
Step 5: Stopping
You can stop the product with the command:
export JAVA_HOME=/opt/IBM/BPM/v8.5.7/java
$ACTIVEMQ_HOME/bin/activemq stop
Step 6: Access to installed Active MQ services
The following services are available in the default configuration:
- Queue handling (various protocols):
tcp://0.0.0.0:61616?maximumConnections=1000&wireFormat.maxFrameSize=104857600stomp://0.0.0.0:61613?maximumConnections=1000&wireFormat.maxFrameSize=104857600mqtt://0.0.0.0:1883?maximumConnections=1000&wireFormat.maxFrameSize=104857600ws://0.0.0.0:61614?maximumConnections=1000&wireFormat.maxFrameSize=104857600
- Broker administration panel:
http://127.0.0.1:8161/, default accessadmin/admin.
Changing default settings
1. Changing access to the administration panel
Changing access to the administration panel: change the $ACTIVEMQ_HOME/conf/jetty.xml file:
<bean id="jettyPort" class="org.apache.activemq.web.WebConsolePort" init-method="start">
    <property name="host" value="0.0.0.0"/>
    <property name="port" value="8161"/>
</bean>
2. Changing default user passwords
Changing the default passwords for admin and user users: change the $ACTIVEMQ_HOME/conf/jetty-realm.properties file:
# Defines users that can access the web (console, demo, etc.)
# username: password [,rolename ...]
admin: change_me01, admin
user: change_me01, user
Apache ActiveMQ Resource Adapter
A data source package needed to install the client on the IBM WebSphere application server. You can read more on this topic at ActiveMQ Resource Adapter.
Downloading Resource Adapter
The directory with the product releases is on the Maven repository page. The currently used version is 5.16.2, so the download command is:
wget -b -t0 --no-check-certificate https://repo1.maven.org/maven2/org/apache/activemq/activemq-rar/5.16.2/activemq-rar-5.16.2.rar
Installing Resource Adapter
Installation steps:
Step 1: Logging in to the IBM WebSphere console
Log in to the IBM WebSphere console available at https://<dmgr_server_name>:<port>/ibm/console, e.g., https://localhost:9043/ibm/console.
Step 2: Resource adapter configuration
Go to: Resources > Resource adapters > Resource adapters and click the Install RAR button in the header of the table showing already defined adapters.
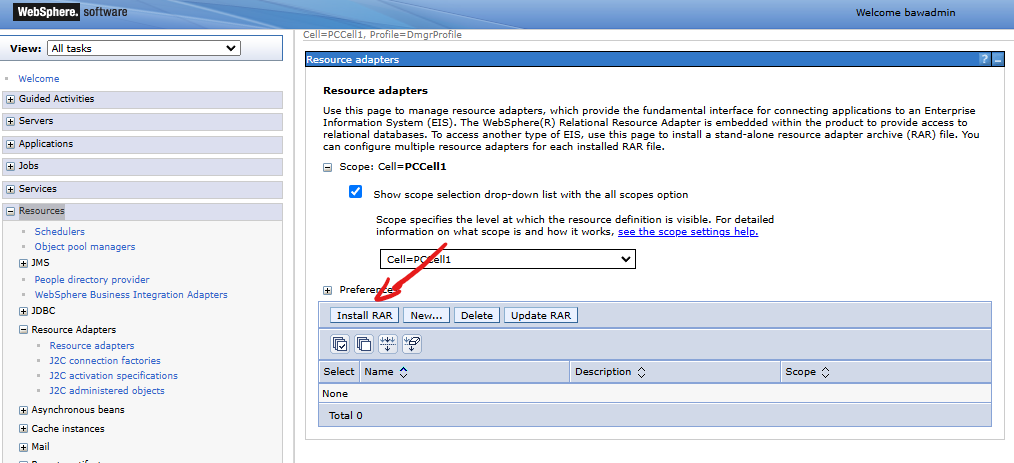
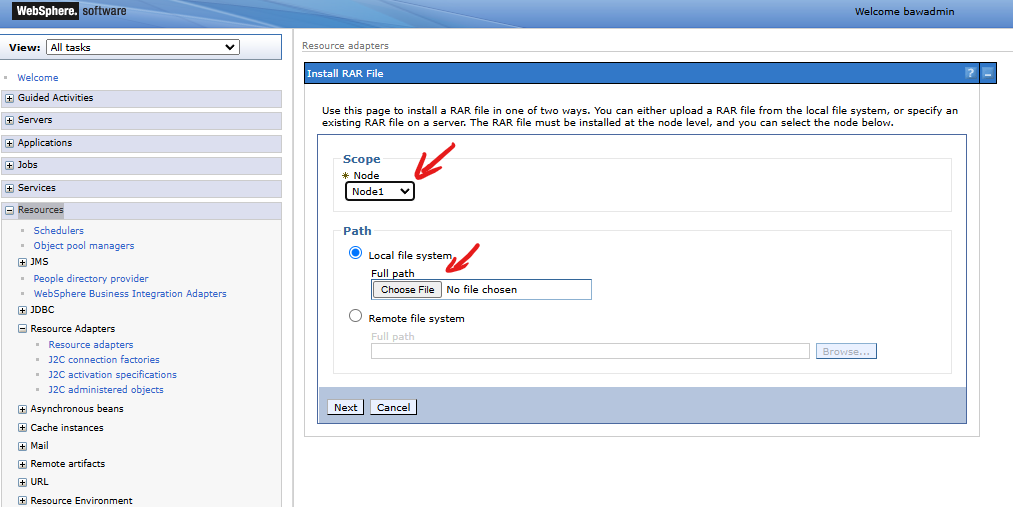
Follow the defined wizard steps. First, select/set the value of the Scope field to Node1. Next, point to our downloaded file with the adapter definition activemq-rar-x.x.x.rar. Click the Next button.
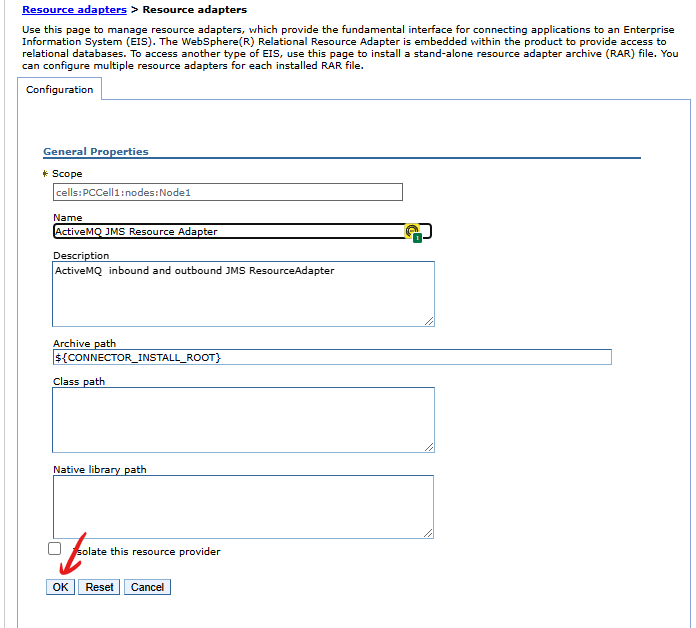
Step 3: Completing adapter data
In the next step, a form appears with the default values filled in. Leave it as it is and click the OK button.
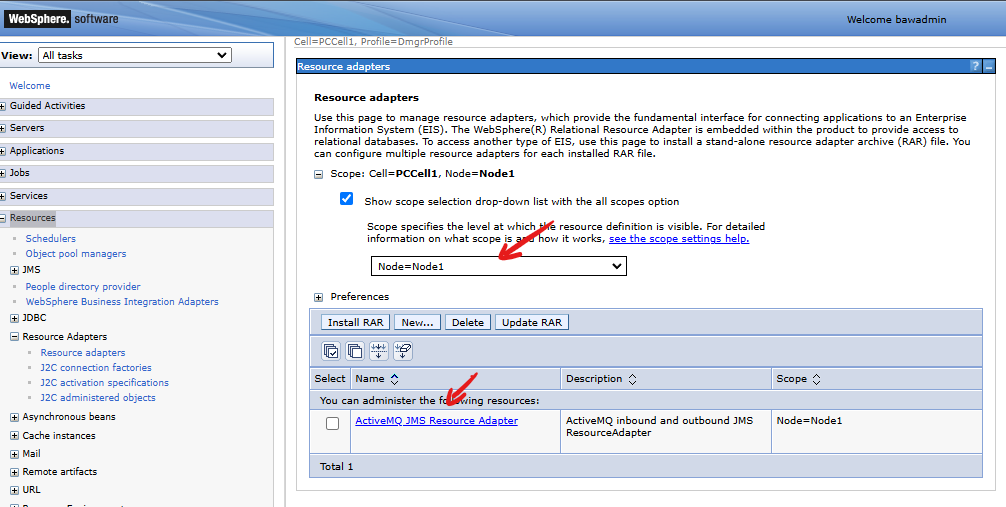
Step 4: Changing the ActiveMQ server address
Again, go to: Resources > Resource adapters > Resource adapters, select the scope Node1, and the list of defined adapters will show our defined ActiveMQ JMS Resource Adapter.
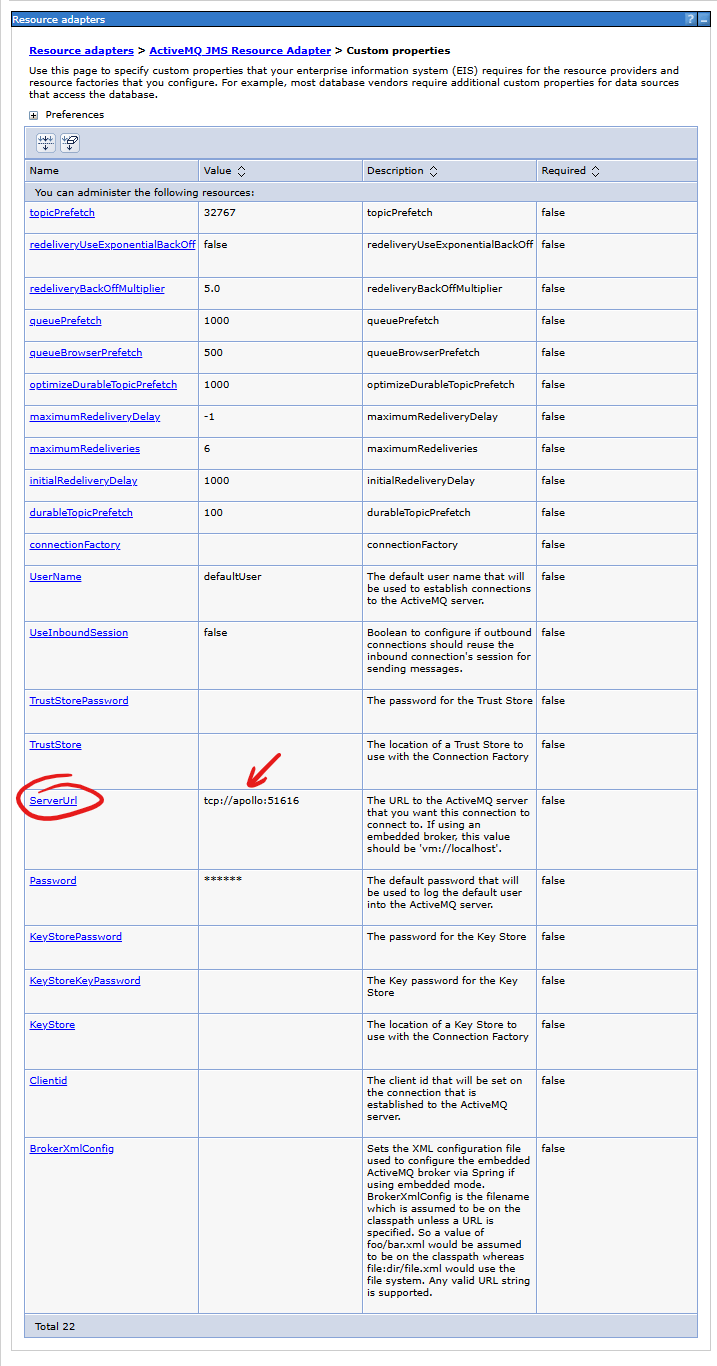
By default, the adapter has a connection defined to the Apache ActiveMQ server at: tcp://localhost:61616. To change this, you need to set the ServerUrl parameter among the Custom properties. The following illustrations present the individual steps for setting the appropriate value:
- Select the
Custom propertiestab:
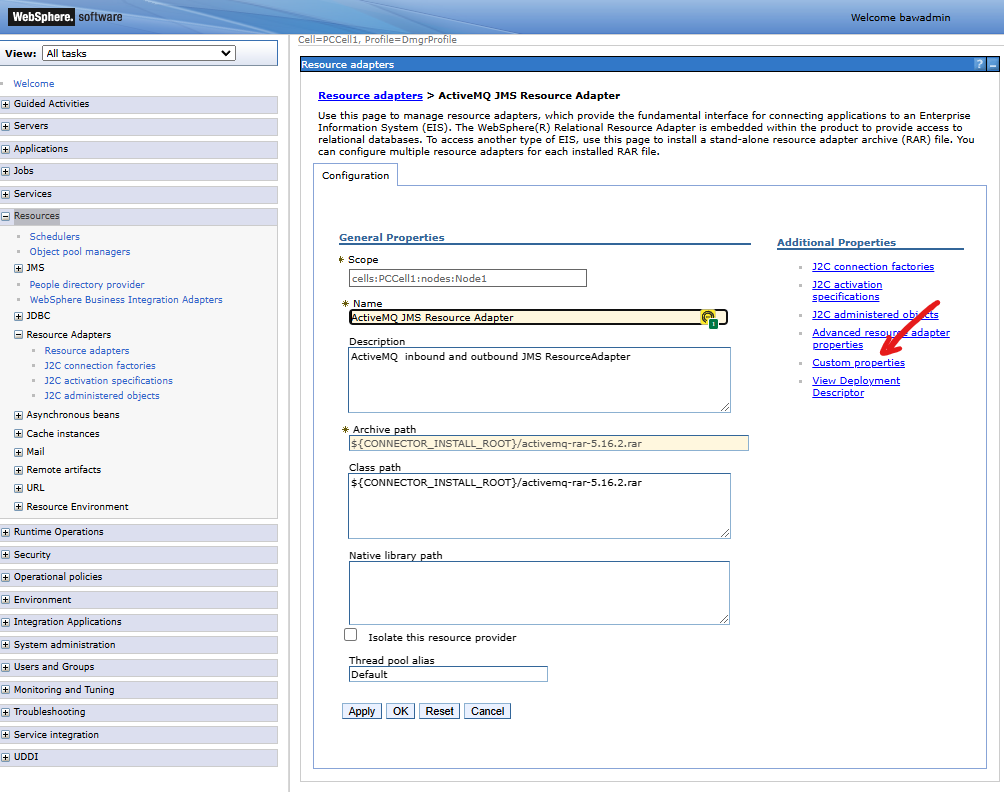
- Set the value of the parameter:
ServerUrl
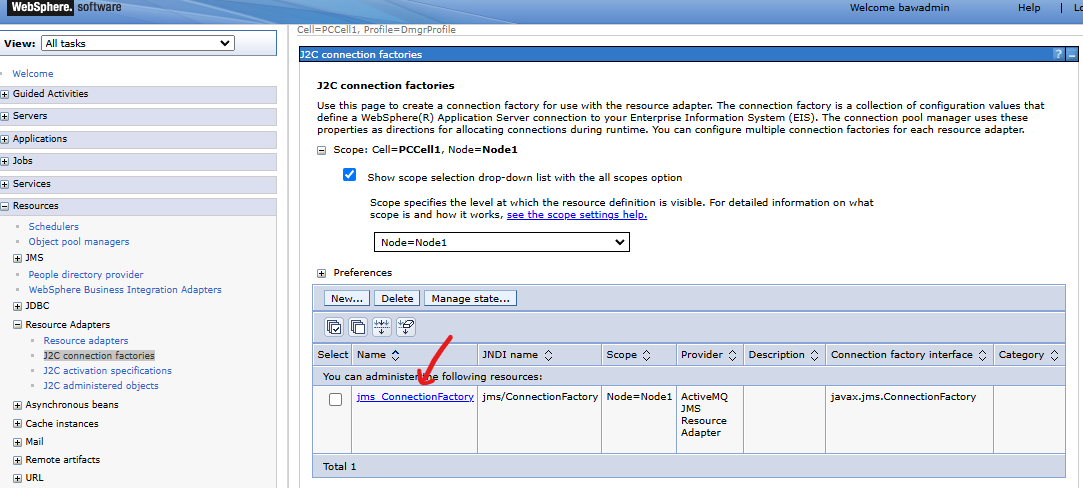
J2C connection factories Configuration
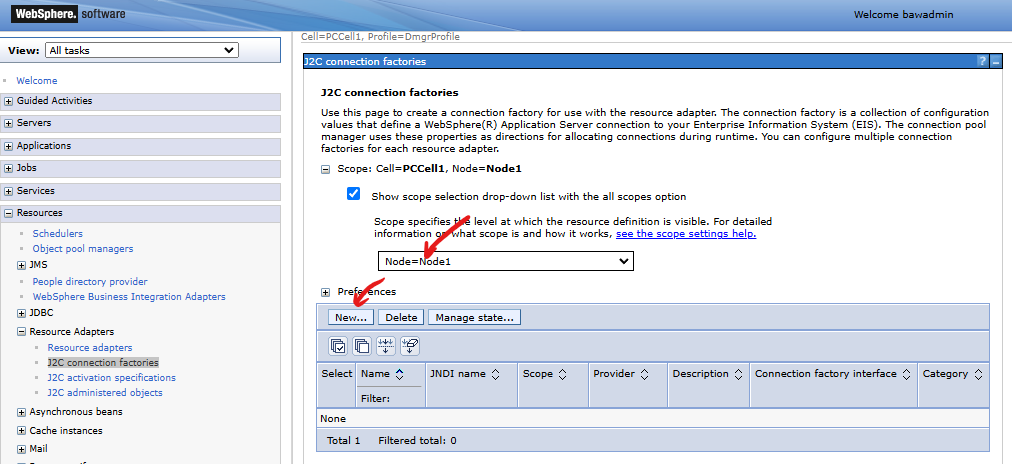
To use the connection of the defined adapter, you must define the J2C connection factories. The individual configuration steps:
Step 1: Connection definition configuration
Go to: Resources > Resource adapters > J2C connection factories. We need to select the scope in which we will define the connection. In our case, it will be Node1. Click the New... button located in the header of the table displaying already defined connections.
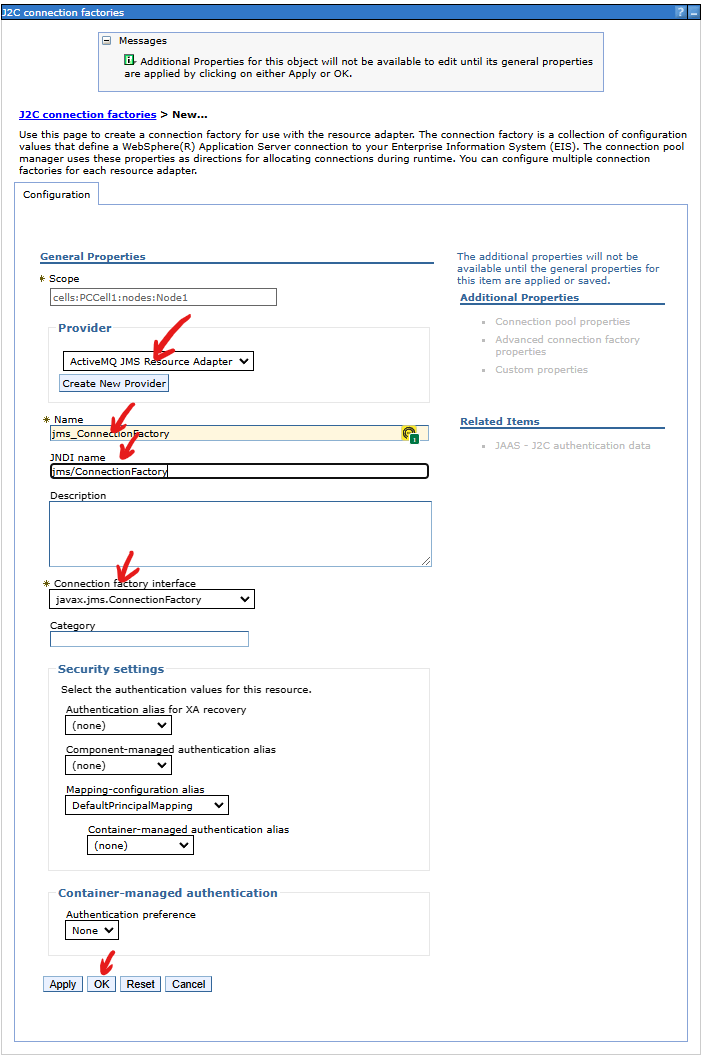
A form appears where we define the values of the required fields:
- Provider - we select the name
ActiveMQ JMS Resource Adapterof the previously defined adapter. - Name - the name of the defined connection, e.g.,
jms_ConnectionFactory - JNDI name - the JNDI name of the connection, e.g.,
jms/ConnectionFactory - Connection factory interface - from the list, we select the value
javax.jms.ConnectionFactory. - The remaining fields are optional; we fill them in if required by the connection definition.
- Click the OK button.
Step 2: Reviewing connection definitions
After saving the changes, the created definition will appear in the scope list of Node1:
Step 3: Restart the environment
Restart the environment.